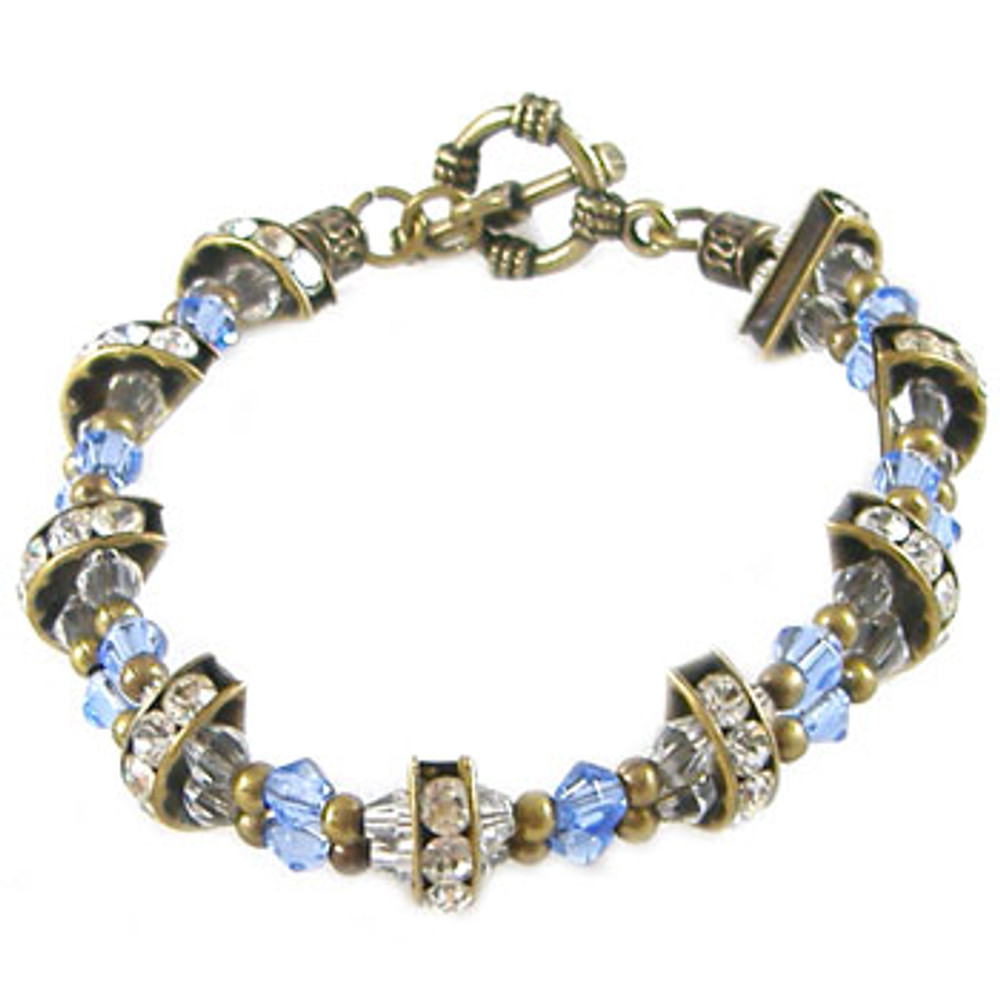
Blue and Bronze Diamante Spacer Bracelet: Project Instructions
Bronze coloured findings make all the difference in this elegant bracelet. Featuring sparkly spacers and light blue crystals, this two strand bracelet is a hit with everyone!
MATERIALS REQUIRED
- 50cm tigertail
- 9 half moon 2 strand diamante spacers
- 3 strong jump rings
- 32 plain metal beads
- 1 small tube crimp
- 1 large tube crimp
- 2 filigree metal tubes
- 1 rope circle toggle clasp
- 36 clear 4mm bicone glass crystals
- 16 coloured 4mm bicone glass crystals
TOOLS REQUIRED
- Twirly Wirlie Pliers
- Wire Cutters
- Crimping Pliers
INSTRUCTIONS
Take your strand of tigertail, and fold in half. Thread a jump ring over one strand, up to the fold. Then bring the two strands together, and thread on a small crimp. Bring up to the jump ring, and squish down. Thread on a filigree metal tube (to hide the crimp). Split up the two strands, and thread a clear 4mm bicone glass crystal on each strand.
Next, thread on:
- one of the half moon 2 strand diamante spacers (through the two strands)
- a clear 4mm bicone glass crystal on each strand
- a plain metal bead on each strand
- a coloured 4mm bicone glass crystal on each strand
- a plain metal bead on each strand
- a clear 4mm bicone glass crystal on each strand
Repeat pattern 8 times, making sure you thread the same strand through the diamante spacer each time. Finish by threading one more half moon 2 strand diamante spacers through the two strands. Thread a clear 4mm bicone glass crystal on each strand, and then bring the two strands together. Thread on a large crimp, followed by a filigree metal tube and a jump ring. Thread the two strands of tigertail over the jump ring, and back through the filigree metal tube and large crimp. Pull up tightly and squish down the crimp. Cut off any excess tigertail.
Open up a new jump ring, and thread onto one end of the bracelet. Whilst it is still open, thread on the bar part of the toggle clasp. Close securely. Open up the jump ring on the other end of the bracelet, and thread on the circle part of the toggle clasp. Close securely. Your bracelet is now ready to wear!
© www.eurekabeads.com.au These free beading instructions may be used for personal use only [EX30261]
Recent Posts
-
Simple Wooden Necklace: Project Instructions
Using large lightweight wooden beads, this versatile necklace can be worn long, eliminating the need …16th Dec 2025 -
Angel Earrings: Project Instructions
Create a sweet pair of handmade earrings featuring glass flower beads and angel wings. This beginner …19th Sep 2025 -
Midnight Shine Hematine & Crystal Bracelet Tutorial
Looking for a quick, elegant bracelet project using two-hole beads and silk thread? This step-by-ste …1st Jul 2025


