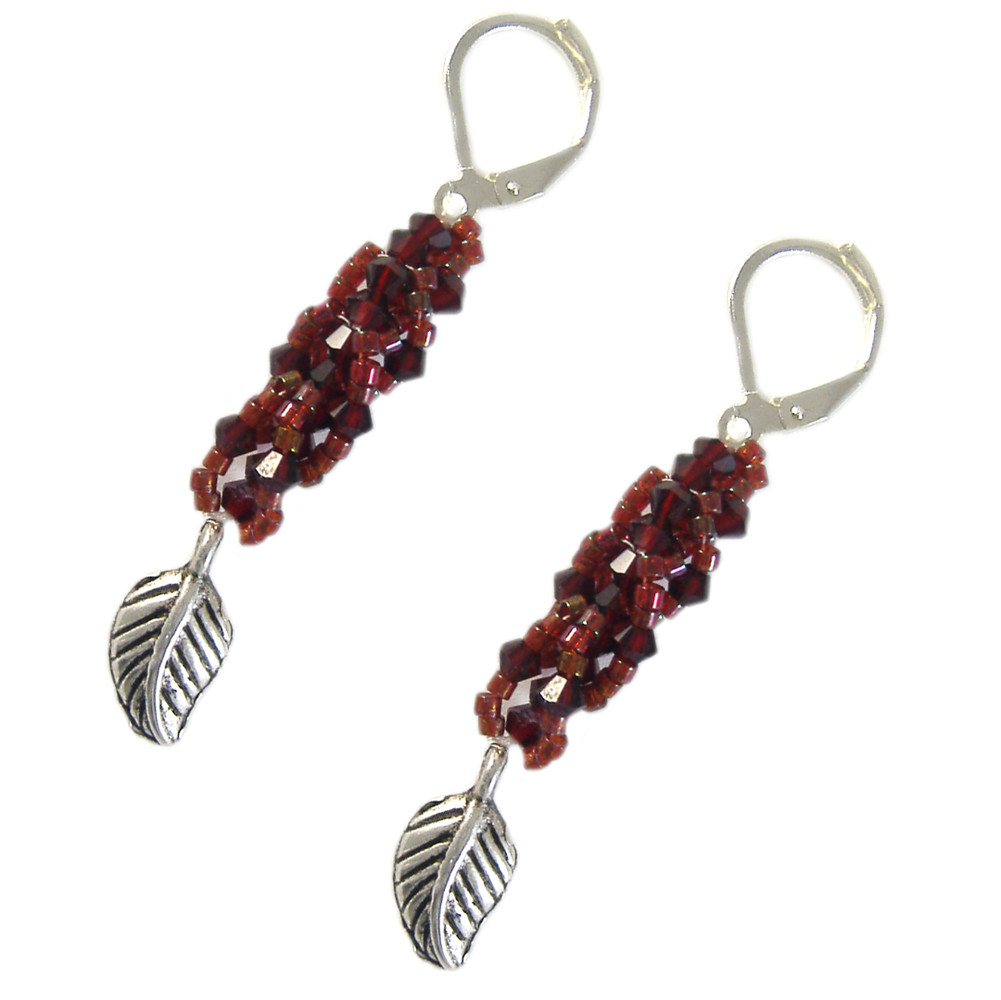
Garnet Swarovski & Delica Earrings: Project Instructions
Follow our free project instructions to make these dainty garnet red earrings. Featuring Swarovski crystal and small Japanese Delica seed beads, this project is intricate but worth it in the end!
MATERIALS REQUIRED
- 2 x 30cm of fireline
- 2 x Small Curled Leaf Metal Charms
- 2 x silver lever arch ear wires
- 36 x 3mm Garnet Swarovski Crystal Bicones
- 96 x Size 11 Miyuki Delica Seed Beads (DB0105)
TOOLS REQUIRED
- Thread Cutter
- Beading Needle
INSTRUCTIONS
STEP 1
Pick up one of your pieces of fireline and tie the small curled leaf metal charm tightly onto one end. Trim any excess fireline with the thread cutter. Thread you beading needle onto the other end.
Thread on four 3mm garnet Swarovski crystal bicones and let them fall down to where the leaf charm is sitting. Next thread on:
- 3 x size 11 Miyuki delica seed beads
- 1 x 3mm garnet Swarovski crystal bicone
- 3 x size 11 Miyuki delica seed beads
Bring your beading needle back up through the first four 3mm Swarovski Crystal Core Beads that you threaded on at the start (we'll refer to these bicones as the core beads). This will form a loop with three size 11 Miyuki delica seed beads, one 3mm garnet Swarovski crystal bicone and another three size 11 Miyuki delica seed beads on one side of your swarovski core beads.
Repeat this for the other side, i.e. thread on:
- 3 x size 11 Miyuki delica seed beads
- 1 x 3mm garnet Swarovski crystal bicone
- 3 x size 11 Miyuki delica seed beads
and bring your beading needle back through the first four 3mm Swarovski crystal core beads again.
STEP 2
Thread two 3mm garnet Swarovski crystal bicones onto your fireline followed by:
- 3 x size 11 Miyuki delica seed beads
- 1 x 3mm garnet Swarovski crystal bicone
- 3 x size 11 Miyuki delica seed beads
This time thread your needle back through the last 4 core 3mm Garnet Swarovski Crystal Bicones. Repeat this process for the loop of beads on the other side.
Repeat Step 2 another 2 times, until you have ten 3mm garnet Swarovski crystal bicones core beads.
Making sure that your thread is pulled tight, tie your fireline onto the loop at the bottom of you lever arch earwire and cut off any excess thread using your thread cutter. Repeat to make your second earring.
© www.eurekabeads.com.au These free beading instructions may be used for personal use only [EX50101]
Recent Posts
-
Simple Wooden Necklace: Project Instructions
Using large lightweight wooden beads, this versatile necklace can be worn long, eliminating the need …16th Dec 2025 -
Angel Earrings: Project Instructions
Create a sweet pair of handmade earrings featuring glass flower beads and angel wings. This beginner …19th Sep 2025 -
Midnight Shine Hematine & Crystal Bracelet Tutorial
Looking for a quick, elegant bracelet project using two-hole beads and silk thread? This step-by-ste …1st Jul 2025


