Olive Green Twist Tube Necklace: Project Instructions
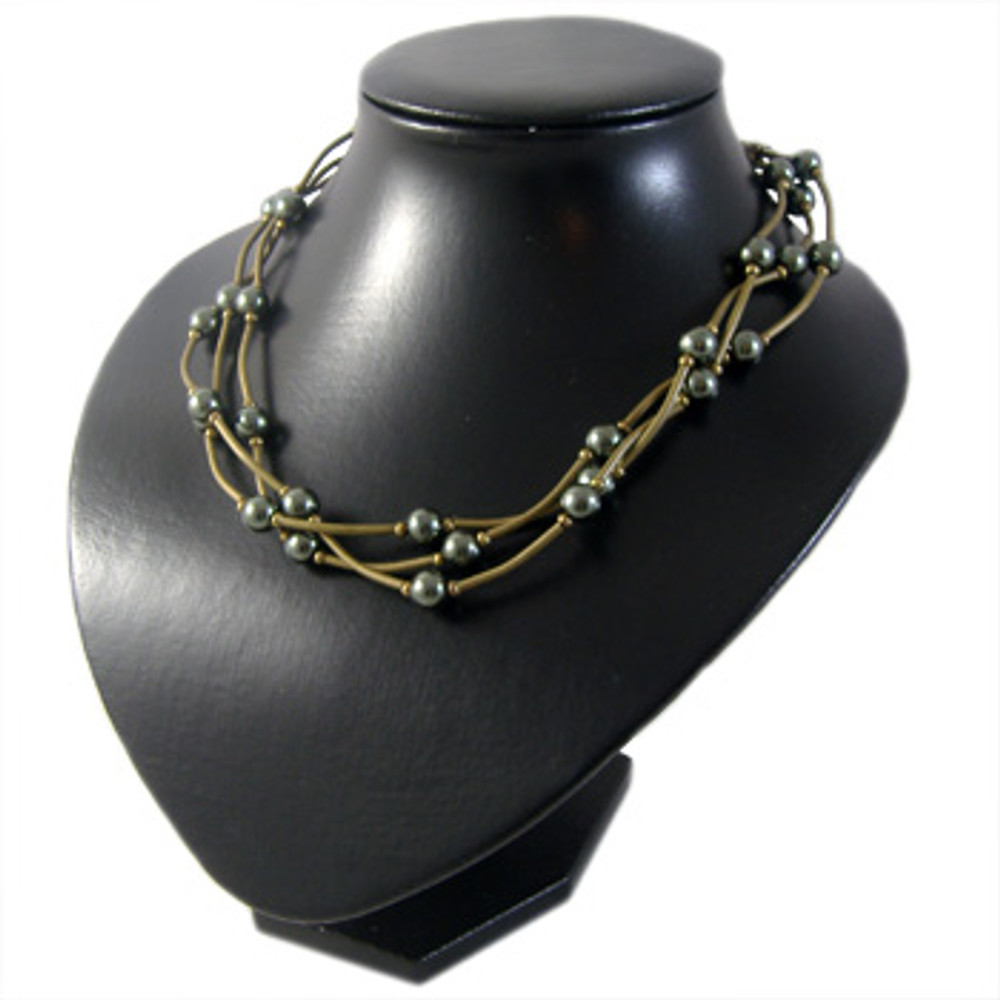
Our olive green twist tube necklace kits fly off the shelves - make your own today! Featuring glass pearls and bronze findings, follow our step by step instructions to get going.
MATERIALS REQUIRED
- 3 x 60cm tigertail
- 1 parrot clasp
- 2 jump rings
- 2 eye pins
- 2 long decorative bead caps
- 36 x 8mm glass pearl beads
- 39 plain curved metal tubes
- 72 plain metal beads
- 3 small crimps
- 2 large crimps
TOOLS REQUIRED
- Crimping Pliers
- Wire Cutters
- Twirly Wirlies
INSTRUCTIONS
note: these quantities make a 50cm length necklace. To make a longer necklace, simply add more tigertail and beads. Our necklace was made with olive green glass pearls and bronze findings
Take the three strands of tigertail and thread through a large crimp, through one of the loops on one of the eye pins and back through the crimp. Squish the crimp down and cut off any excess tigertail. Take one piece of tigertail and thread on:
- a plain curved metal tube
- a plain metal bead
- an 8mm glass pearl bead
- a plain metal bead
Repeat process 12 times, until you have twelve 8mm glass pearl beads on your strand. Finish by thread on one more plain curved metal tube. To make sure everything doesn't fall off this strand whilst we are working on the other strand, thread a small crimp on the very end of the tigertail and squish down - this crimp will be cut off later, to complete the necklace, but in the meantime, it will ensure your hard work isn't lost.
Repeat all of the above with the other two strands.
Cut off the crimps that were squished onto the ends of the strands earlier. Bring the three strands together and thread through a large crimp. Then thread through the loop on the second eye pin and back through the crimp. Pull up and squish the crimp down. Cut off any excess tigertail.
Thread the straight part of the eye pin through one of the long decorative bead caps (so that the three strands come up to the larger opening of the bead cap, with the eye pin poking out the top of the smaller end) and pull up reasonably tightly. Leaving a space of 10mm, cut the excess off the eye pin. Twirl the end using your twirly wirlies. Open up a jump ring and thread through the loop you just created, and a jump ring. Close securely.
On the other side of the necklace (the side with the eye pin already attached), repeat the above process, so that you have a long decorative bead cap and a jump ring on either side. Open up one of the jump rings on one side of the necklace, and thread on the parrot clasp. Close securely.
Lastly, we need to create the "twist" effect. Hold one end of the necklace in your right hand and one hand in your left hand. Separate the strands in your left hand with your fingers. With your right hand, thread between the top two strands in your left hand. Pull through, then thread between the bottom two strands in your left hand. Repeat the process another 5 times or until you are happy with the twist effect. Your necklace is now complete and ready to wear!
© www.eurekabeads.com.au These free beading instructions may be used for personal use only [EX17401 EX99421]
Recent Posts
-
Simple Wooden Necklace: Project Instructions
Using large lightweight wooden beads, this versatile necklace can be worn long, eliminating the need …16th Dec 2025 -
Angel Earrings: Project Instructions
Create a sweet pair of handmade earrings featuring glass flower beads and angel wings. This beginner …19th Sep 2025 -
Midnight Shine Hematine & Crystal Bracelet Tutorial
Looking for a quick, elegant bracelet project using two-hole beads and silk thread? This step-by-ste …1st Jul 2025


