Floating Crystal Necklace: Project Instructions
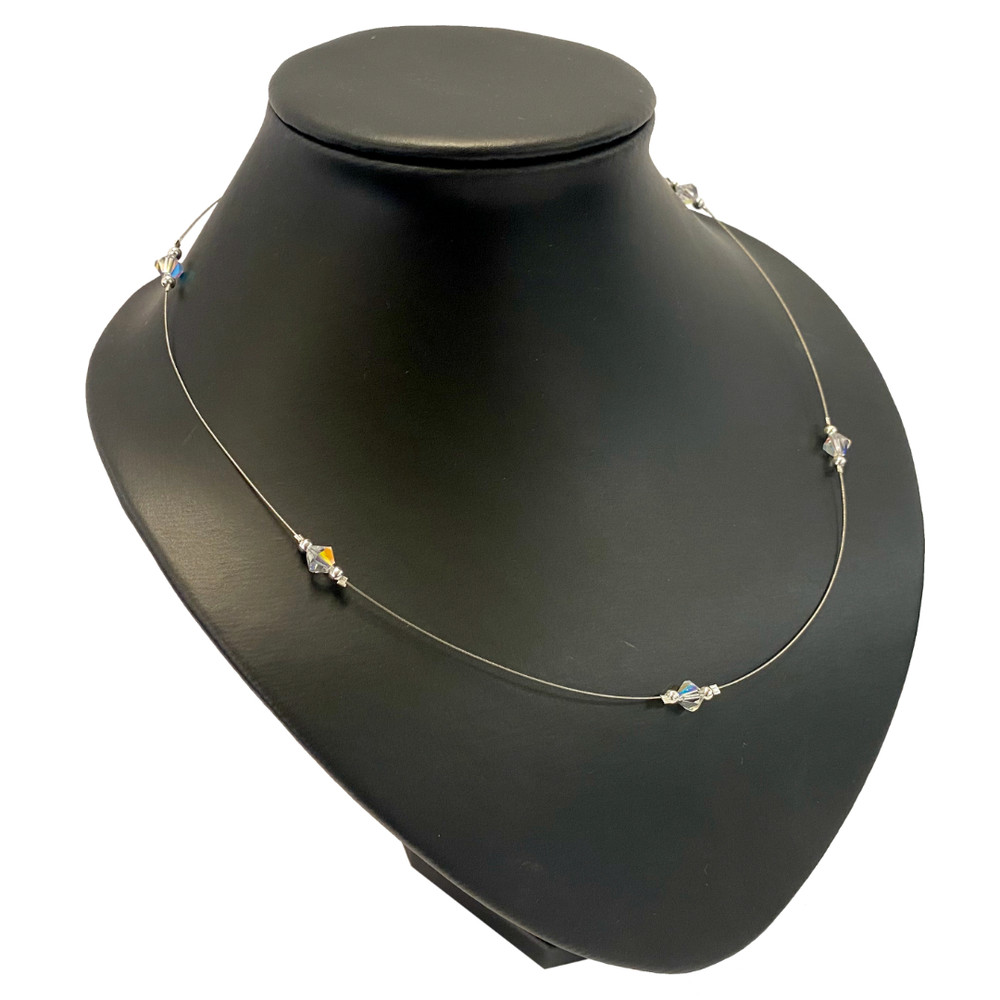
Discover how to make a stunning crystal floating necklace with our free step-by-step instructions. This beginner-friendly project features gorgeous 6mm Preciosa bicone glass crystal beads in classic crystal AB, perfect for learning the basics of beading. With clear guidance, you'll work with tigertail wire, crimps, jump rings, and more, all while creating a beautiful, delicate necklace.
MATERIALS REQUIRED
- 50cm tigertail
- 6 x 6mm bicone Preciosa crystal AB beads
- 1 parrot clasp
- 12 small crimps
- 4 jump rings
- 14 plain metal balls
- 1 head pin
TOOLS REQUIRED
- Crimping Pliers
- Wire Cutters
- Twirlie Wirlie Pliers
STEP-BY-STEP INSTRUCTIONS
-
Thread one end of the tigertail through a crimp, a metal ball, and the loop on the parrot clasp. Pass the wire back through the metal ball and crimp. Use crimping pliers to secure the crimp in place.
-
Thread on a crimp, 70mm from the clasp, and crimp into place. Then thread on one metal ball, one 6mm bicone crystal, one metal ball, and another crimp. Secure the crimp.
-
Repeat step 2 for five sets of floating beads, each spaced 70mm apart. Put aside for now.
-
To add a jump ring: Use two sets of pliers (crimping pliers and twirlie wirlies) to open a jump ring, then close it. On the end without the clasp, thread on a crimp (don’t squeeze it yet) 70mm from the last set of beads, a metal ball, and thread on the closed jump ring. Pass the wire back through the metal ball and crimp. Tighten, crimp, and trim excess wire.
-
Attach the extension chain: Open one of the remaining jump rings and thread it onto the jump ring on your necklace. Repeat this for three jump rings to form the chain.
-
To create the decorative tag: Thread one metal ball, one crystal, and one metal ball onto the head pin. Trim the head pin to 10mm above the last metal ball. Use twirlie wirlie pliers to bend the pin into a loop. Open the loop you've just made and connect to the last jump ring in the chain, then close securely.
Your floating crystal necklace is now ready to wear!
© www.eurekabeads.com.au These free beading instructions may be used for personal use only. Visit www.eurekabeads.com.au for access to hundreds of free beading tutorials, creative inspiration, and expert tips. We are an Australia-based supplier, offering thousands of high-quality beads and jewellery-making products, with affordable prices and fast shipping Australia-wide. Explore our wide selection of beading materials, including glass beads, gemstone beads, seed beads, crystals, charms, findings, and stringing supplies to bring your projects to life! Whether you’re into DIY jewellery, bead weaving, macramé, or craft kits, we’ve got the supplies to support your creativity. [EX00415]
Recent Posts
-
Simple Wooden Necklace: Project Instructions
Using large lightweight wooden beads, this versatile necklace can be worn long, eliminating the need …16th Dec 2025 -
Angel Earrings: Project Instructions
Create a sweet pair of handmade earrings featuring glass flower beads and angel wings. This beginner …19th Sep 2025 -
Midnight Shine Hematine & Crystal Bracelet Tutorial
Looking for a quick, elegant bracelet project using two-hole beads and silk thread? This step-by-ste …1st Jul 2025


