Simple Cube Floating Necklace: Project Instructions
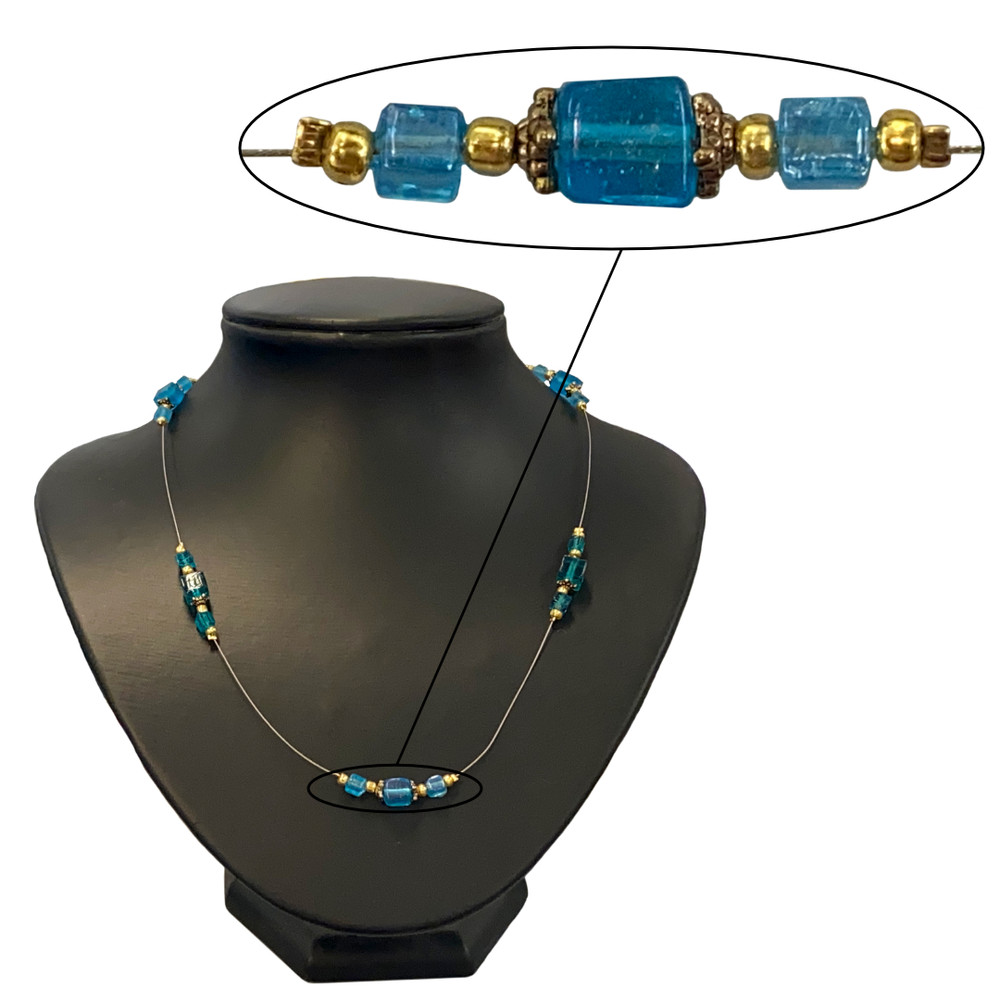
Create a stunning floating bead necklace with this easy-to-follow beading pattern! Using cube glass beads, seed beads, and star bead caps, you’ll craft a delicate, stylish piece with evenly spaced floating bead clusters. Perfect for beginners and experienced beaders alike, this project allows you to experiment with colours to create a truly unique design.
MATERIALS REQUIRED
- 50cm tigertail wire
- 1 x parrot clasp
- 1 x tag end
- 12 x crimp beads
- 20 x 8/0 glass seed beads
- 10 x 5mm cube glass beads
- 5 x 7mm cube glass beads
- 10 x small star bead caps
TOOLS REQUIRED
- Crimping Pliers
- Wire Cutters
STEP-BY-STEP INSTRUCTIONS
Step 1: Attach the Clasp
- Thread one end of the tigertail wire through a crimp bead and the loop on the parrot clasp.
- Loop the tigertail back through the crimp bead.
- Using crimping pliers, squeeze the crimp shut to secure the clasp.
Step 2: Create the First Floating Bead Set
- Measure 5cm from the clasp and thread on a crimp bead. Flatten the crimp to hold the beads in place.
- Thread on the following beads in order:
- 1 x 8/0 glass seed bead
- 1 x 5mm cube glass bead
- 1 x 8/0 glass seed bead
- 1 x small star bead cap
- 1 x 7mm cube glass bead
- 1 x small star bead cap
- 1 x 8/0 glass seed bead
- 1 x 5mm cube glass bead
- 1 x 8/0 glass seed bead
- Finish by threading on a crimp bead and flattening it in place.
Step 3: Add More Floating Bead Clusters
- Leave another 5cm gap, then thread on a crimp bead and repeat Step 5–6 to create a second bead cluster.
- Continue this process until you have 5 floating bead clusters spaced evenly along the necklace.
- Have fun mixing aqua and teal beads or other colour combinations to customise your design!
Step 4: Secure the Tag End
- To finish, thread on a crimp bead followed by the small hole in the tag end.
- Loop the tigertail back through the crimp bead and pull tightly.
- Flatten the crimp bead and trim any excess tigertail wire.
Your floating bead necklace is now ready to wear – a beautiful and lightweight design perfect for any occasion!
© www.eurekabeads.com.au These free beading instructions may be used for personal use only. Visit www.eurekabeads.com.au for access to hundreds of free beading tutorials, creative inspiration, and expert tips. We are an Australia-based supplier, offering thousands of high-quality beads and jewellery-making products, with affordable prices and fast shipping Australia-wide. Explore our wide selection of beading materials, including glass beads, gemstone beads, seed beads, crystals, charms, findings, and stringing supplies to bring your projects to life! Whether you’re into DIY jewellery, bead weaving, macramé, or craft kits, we’ve got the supplies to support your creativity. [EX35422]
Recent Posts
-
Simple Wooden Necklace: Project Instructions
Using large lightweight wooden beads, this versatile necklace can be worn long, eliminating the need …16th Dec 2025 -
Angel Earrings: Project Instructions
Create a sweet pair of handmade earrings featuring glass flower beads and angel wings. This beginner …19th Sep 2025 -
Midnight Shine Hematine & Crystal Bracelet Tutorial
Looking for a quick, elegant bracelet project using two-hole beads and silk thread? This step-by-ste …1st Jul 2025


