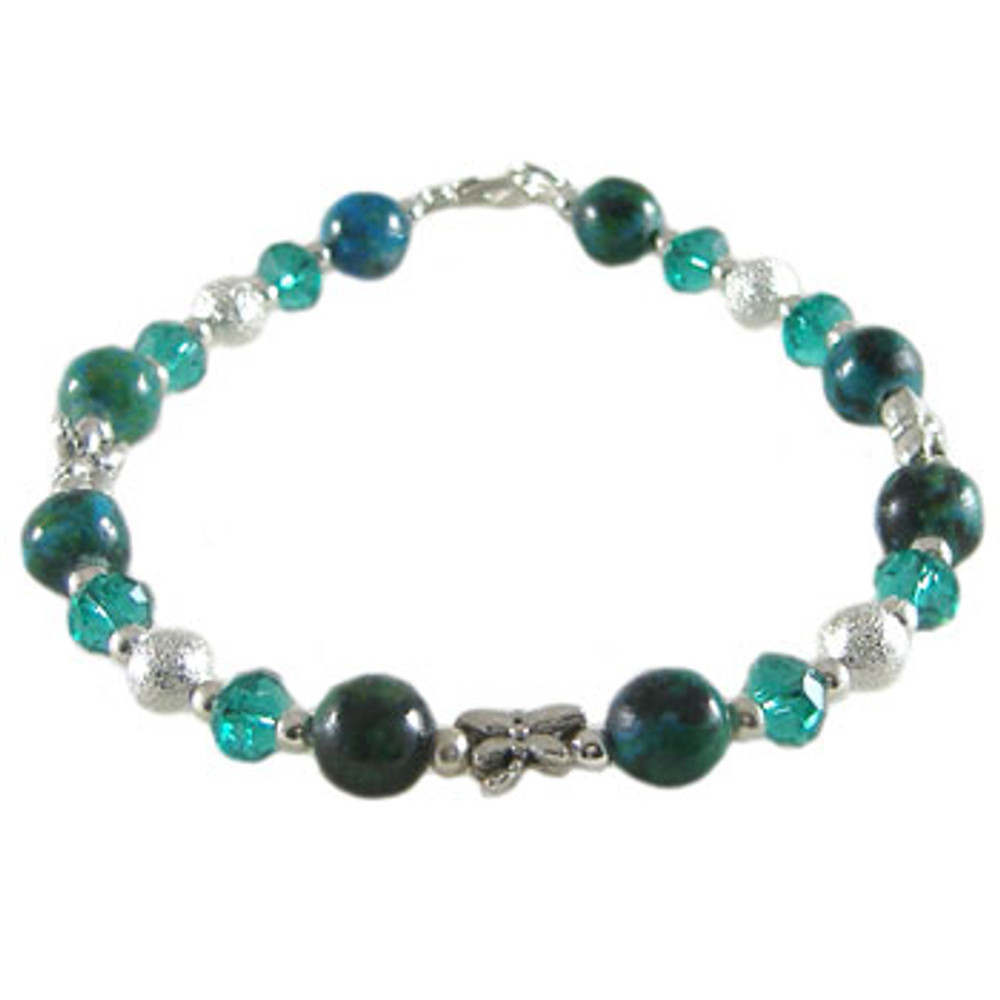
Simple Teal Bling Bracelet: Project Instructions
Featuring dragonfly metal beads, gemstone beads and crystal beads, these bracelet stands above the rest! Follow our instructions to learn how to make this simple tigertail bracelet.
MATERIALS REQUIRED
- 30cm tigertail
- 2 small crimps
- 1 x 6mm strong jump ring
- 2 crimp covers
- 8 x chrysocolla 8mm round beads
- 22 x 3mm plain metal beads
- 8 x 6mm rondelle glass crystal beads
- 4 x 6mm stardust metal beads
- 3 x dragonfly metal beads
- 1 parrot clasp
TOOLS REQUIRED
- 2 pairs of Crimping Pliers
- Wire Cutters
INSTRUCTIONS
Pick up your piece of tigertail and thread it through a small crimp, then through the strong jump ring. Thread back through the small crimp and pull up tight. Squish securely and cut off any excess tigertail. Place a crimp cover around the squashed crimp and gently squish into a round ball with your pliers to hide the crimp.
Next, thread on:
- a chrysocolla 8mm round bead
- a plain metal bead
- a 6mm rondelle glass crystal bead
- a plain metal bead
- a 6mm stardust metal bead
- a plain metal bead
- a 6mm rondelle glass crystal bead
- a plain metal bead
- a chrysocolla 8mm round bead
- a plain metal bead
- a dragonfly metal bead
- a plain metal bead
Repeat pattern another 2 times, so that you have three dragonfly metal beads on your bracelet.
Finish by threading on:
- a chrysocolla 8mm round bead
- a plain metal bead
- a 6mm rondelle glass crystal bead
- a plain metal bead
- a 6mm stardust metal bead
- a plain metal bead
- a 6mm rondelle glass crystal bead
- a plain metal bead
- a chrysocolla 8mm round bead
Thread on a small crimp, then through the loop on the parrot clasp, then back through the small crimp. Pull up tightly (but leave enough space to put another crimp cover over the crimp) and squish down the small crimp. Cut off any excess tigertail. Place a crimp cover around the squashed crimp and gently squish into a round ball with your pliers to hide the crimp. Your bracelet is now ready to wear!
© www.eurekabeads.com.au These free beading instructions may be used for personal use only [EX20201]
Recent Posts
-
Simple Wooden Necklace: Project Instructions
Using large lightweight wooden beads, this versatile necklace can be worn long, eliminating the need …16th Dec 2025 -
Angel Earrings: Project Instructions
Create a sweet pair of handmade earrings featuring glass flower beads and angel wings. This beginner …19th Sep 2025 -
Midnight Shine Hematine & Crystal Bracelet Tutorial
Looking for a quick, elegant bracelet project using two-hole beads and silk thread? This step-by-ste …1st Jul 2025


