Cube Bead Bracelet: Project Instructions
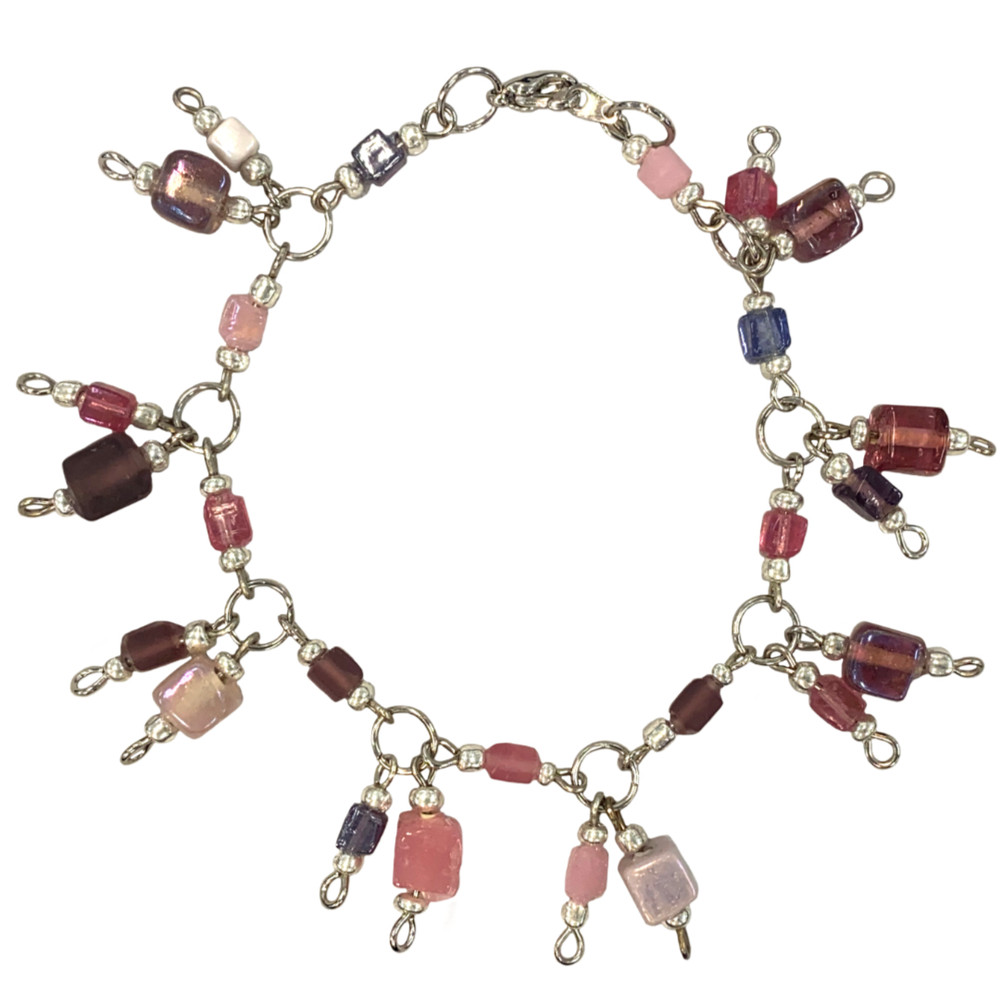
Create a stylish cube bead chain bracelet with this easy-to-follow beading pattern! Using glass seed beads, cube beads, and eye pins, you’ll craft a unique and elegant bracelet perfect for any occasion. Experiment with different colour combinations to create a personalised piece—we used a mix of pinks and purples for a fun, vibrant look!
MATERIALS REQUIRED
- 25 x eye pins
- 30 x 8/0 glass seed beads
- 17 x 5mm cube glass beads
- 8 x 7mm cube glass beads
- 10 x jump rings
- 1 x parrot clasp
- 1 x tag end
TOOLS REQUIRED
- Twirly Wirlie Pliers
- Wire Cutters
STEP-BY-STEP INSTRUCTIONS
Step 1: Make the Small Bead Drops
- Take an eye pin and thread on:
- 1 x 8/0 glass seed bead
- 1 x 5mm cube glass bead
- 1 x 8/0 glass seed bead
- Leaving 10mm of space, trim the excess wire from the eye pin using wire cutters.
- Use Twirly Wirlie Pliers to create a loop at the end of the pin.
- Repeat Step 1–3 until you have 17 small bead drops.
Step 2: Make the Large Bead Drops
- Take another eye pin and thread on:
- 1 x 8/0 glass seed bead
- 1 x 7mm cube glass bead
- 1 x 8/0 glass seed bead
- Leaving 10mm of space, trim the excess wire and create a loop using pliers.
- Repeat Step 5–6 until you have 8 large bead drops.
Step 3: Assemble the Bracelet
- Open a jump ring and thread on:
- 2 small bead drops
- 1 large bead drop
- 1 small bead drop
- Close the jump ring securely.
- Open another jump ring and thread it through the last small bead drop from the first set. Then add:
- 1 small bead drop
- 1 large bead drop
- 1 small bead drop
- Close the jump ring securely.
- Repeat Step 10–11 until all bead drops are linked together, forming a chain. Have fun with different colour patterns—mix and match shades like we did with pinks and purples!
Step 4: Attach the Clasp
- Open a jump ring and thread on the parrot clasp.
- Connect the jump ring to one end of the bracelet by threading it through the last eye pin loop. Close securely.
- Open another jump ring and attach the tag end to the other side of the bracelet. Close securely.
Your cube bead chain bracelet is now ready to wear – a beautiful and eye-catching design that you can customise to suit your style!
© www.eurekabeads.com.au These free beading instructions may be used for personal use only. Visit www.eurekabeads.com.au for access to hundreds of free beading tutorials, creative inspiration, and expert tips. We are an Australia-based supplier, offering thousands of high-quality beads and jewellery-making products, with affordable prices and fast shipping Australia-wide. Explore our wide selection of beading materials, including glass beads, gemstone beads, seed beads, crystals, charms, findings, and stringing supplies to bring your projects to life! Whether you’re into DIY jewellery, bead weaving, macramé, or craft kits, we’ve got the supplies to support your creativity. [EX46201]
Recent Posts
-
Midnight Shine Hematine & Crystal Bracelet Tutorial
Looking for a quick, elegant bracelet project using two-hole beads and silk thread? This step-by-ste …1st Jul 2025 -
Blue Mirage Necklace: Project Instructions
How to Make a Stunning Blue Glass Bead Necklace with Pendant – DIY Jewellery Project Create yo …17th Jun 2025 -
DIY Bluebell Bronze Necklace – Multi-Strand Beaded Project
Bring some ocean-inspired charm to your jewellery collection with this elegant multi-strand necklace …11th Jun 2025


