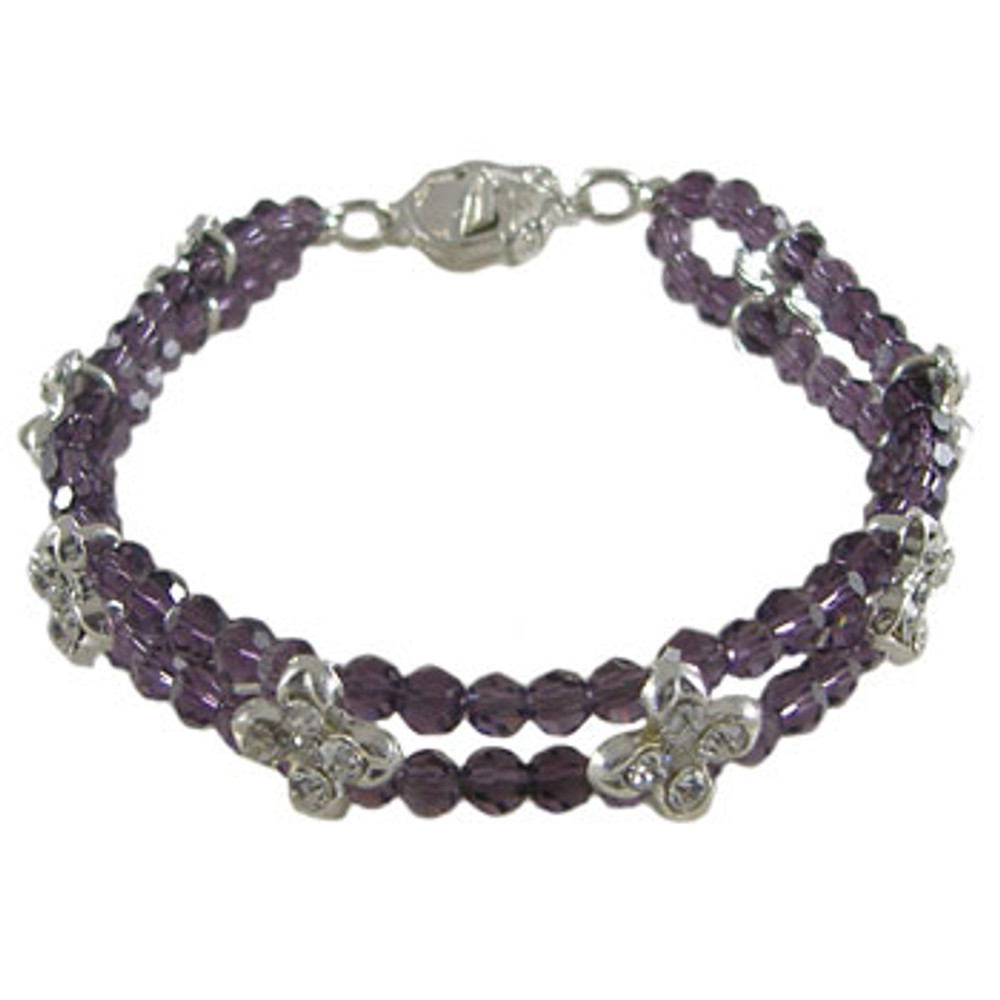
2 Strand Purple/Black Flower Bracelet: Project Instructions
Our two strand black/purple bracelet uses two strand flower spacers, coupled with purple and black crystals and an elegant clasp to finish it off. Follow our free instructions to learn how!
MATERIALS REQUIRED
- 2 x 25cm tigertail
- 5 small crimps
- 4 strong jump rings
- 4 crimp covers
- 24 x 6mm rondelle glass crystal beads
- 24 x 3mm plain metal beads
- 12 x 7mm helix glass crystal beads
- 5 x 2 strand flower beads
- 1 flower diamante 2 strand box clasp
TOOLS REQUIRED
- 2 pairs of Crimping Pliers
- Wire Cutters
INSTRUCTIONS
Pick up one of your strands of tigertail and thread through a small crimp, then through a jump ring. Thread back through the small crimp, pull up tightly, squish securely and cut off any excess tigertail. Place a crimp cover around the squashed crimp and gently squish into a round ball with your pliers to hide the crimp. Pick up the second strand of tigertail and repeat the process so that you have two strands of tigertail with jump rings attached.
Next, thread on:
strand 1
- a 6mm rondelle glass crystal bead
- a plain metal bead
- a small helix glass crystal bead
- a plain metal bead
- a 6mm rondelle glass crystal bead
- left hole of the 2 strand flower bead
strand 2
- a 6mm rondelle glass crystal bead
- a plain metal bead
- a small helix glass crystal bead
- a plain metal bead
- a 6mm rondelle glass crystal bead
- right hole of the 2 strand flower bead
Repeat this pattern another 4 times, so that you have five 2 strand flower beads on your bracelet.
Finish by threading on:
strand 1
- a 6mm rondelle glass crystal bead
- a plain metal bead
- a small helix glass crystal bead
- a plain metal bead
- a 6mm rondelle glass crystal bead
strand 2
- a 6mm rondelle glass crystal bead
- a plain metal bead
- a small helix glass crystal bead
- a plain metal bead
- a 6mm rondelle glass crystal bead
To make sure everything doesn't fall off whilst we are working on the other strand, thread a small crimp on the very end of the tigertail on strand 2 and squish down - this crimp will be cut off later, to complete the necklace, but in the meantime, it will ensure your hard work isn't lost.
On strand one, thread on a small crimp, then thread through a strong jump ring, then back through the small crimp. Pull up tightly (but leave enough space to put another crimp cover over the crimp) and squish down the small crimp. Cut off any excess tigertail. Place a crimp cover around the squashed crimp and gently squish into a round ball with your pliers to hide the crimp. Cut off the small crimp on the end of strand two and repeat the process.
Open up the clasp so that you have the two pieces separate. Open up one of the strong jump rings attached to the bracelet, and thread through one of the holes on the sparkly diamante side of the clasp, close securely. Open up the other strong jump ring on the same side of the bracelet and thread through the second hole on the sparkly diamante side of the clasp, close securely. As you're doing this, make sure that the 2 strand flower bead are facing the same way - ie the top of the beads show when the top of the clasp shows.
Open up one of the strong jump rings attached to the other end of the bracelet, and thread through one of the holes on the other side of the clasp, close securely. Open up the other strong jump ring on the same side of the bracelet and thread through the second hole on the other side of the clasp, close securely. As you're doing this, make sure that the 2 strand flower bead are facing the same way - ie the top of the beads show when the top of the prong side of the clasp shows. Your bracelet is now ready to wear!
© www.eurekabeads.com.au These free beading instructions may be used for personal use only [EX40281]
Recent Posts
-
Midnight Shine Hematine & Crystal Bracelet Tutorial
Looking for a quick, elegant bracelet project using two-hole beads and silk thread? This step-by-ste …1st Jul 2025 -
Blue Mirage Necklace: Project Instructions
How to Make a Stunning Blue Glass Bead Necklace with Pendant – DIY Jewellery Project Create yo …17th Jun 2025 -
DIY Bluebell Bronze Necklace – Multi-Strand Beaded Project
Bring some ocean-inspired charm to your jewellery collection with this elegant multi-strand necklace …11th Jun 2025


