Beaded Scarf Ends: Project Instructions
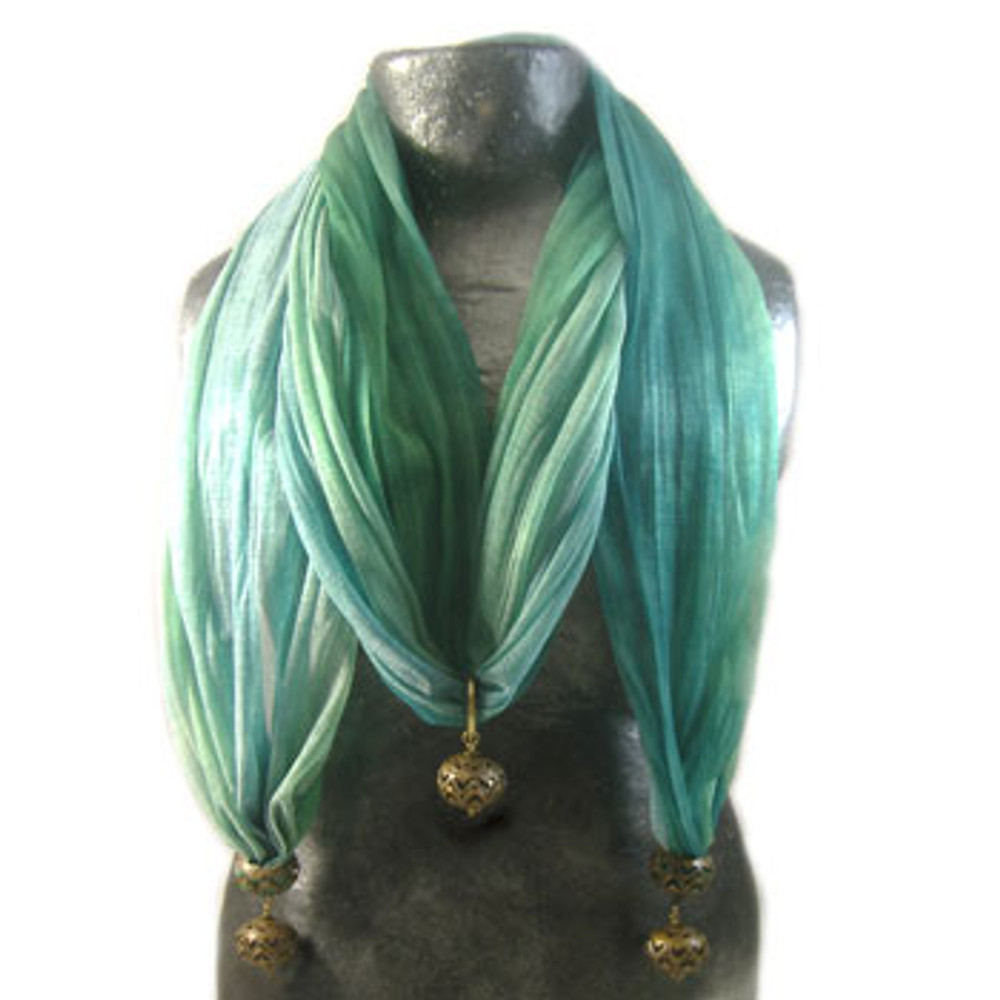
The latest trend, beaded scarves are all the rage. Our simple instructions explain how to add beaded dangles to any thin scarf - once you've got the technique down, you'll be ready to bling up all of your scarves!
MATERIALS REQUIRED
- 3 decorative head pins
- 5 large aluminium flattened ball metal beads
- 3 x 6mm strong jump rings
- 1 x 25mm closed ring
- 1 thin scarf
- 2 x 15cm 20gauge beading wire
TOOLS REQUIRED
- 2 x Crimping Pliers
- Twirly Wirlies
- Wire Cutters
Pick up a decorative head pin and thread on:
- a large aluminium flattened ball metal bead
Leaving a space of 10mm, cut the excess off the head pin. Twirl the end into a closed loop using your twirly wirlies.
Open up one of the 6mm strong jump rings (as they are quite strong, you will need to use two pairs of pliers) and thread it onto the top loop in the flattened ball head pin. Whilst it is still open, thread it onto the 25mm closed ring and then close securely.
Pick up your scarf and thread the 25mm closed ring with its attachments into the centre. Put aside for now.
Pick up one of the large aluminium flattened ball metal beads and cut out the top "star" of metal. You will need to use strong cutters and be careful of the sharp wire. Take one of the ends of the scarf and fold into a point. Wrap a section of thick wire securely around the point and then pass the wire through the inside of the cut flattened metal bead and out through the hole in the bottom. Leaving a space of 10mm, cut the excess off the wire. Twirl the end using your twirly wirlies. Repeat this process with the other end of the scarf.
Pick up another decorative head pin and thread on:
- a large aluminium flattened ball metal bead
Leaving a space of 10mm, cut the excess off the head pin. Twirl the end using your twirly wirlies. Open up another 6mm strong jump ring and thread it onto the top loop in the flattened ball head pin.Whilst it is still open, thread it onto the bottom loop on one end of the scarf. Close securely. Repeat the process of making the flattened ball head pin, and attach to the other end of the scarf. Your beaded scarf is now ready to wear!
© www.eurekabeads.com.au These free beading instructions may be used for personal use only [EX99681]
Recent Posts
-
Midnight Shine Hematine & Crystal Bracelet Tutorial
Looking for a quick, elegant bracelet project using two-hole beads and silk thread? This step-by-ste …1st Jul 2025 -
Blue Mirage Necklace: Project Instructions
How to Make a Stunning Blue Glass Bead Necklace with Pendant – DIY Jewellery Project Create yo …17th Jun 2025 -
DIY Bluebell Bronze Necklace – Multi-Strand Beaded Project
Bring some ocean-inspired charm to your jewellery collection with this elegant multi-strand necklace …11th Jun 2025


