Gold Swirl Earrings: Project Instructions
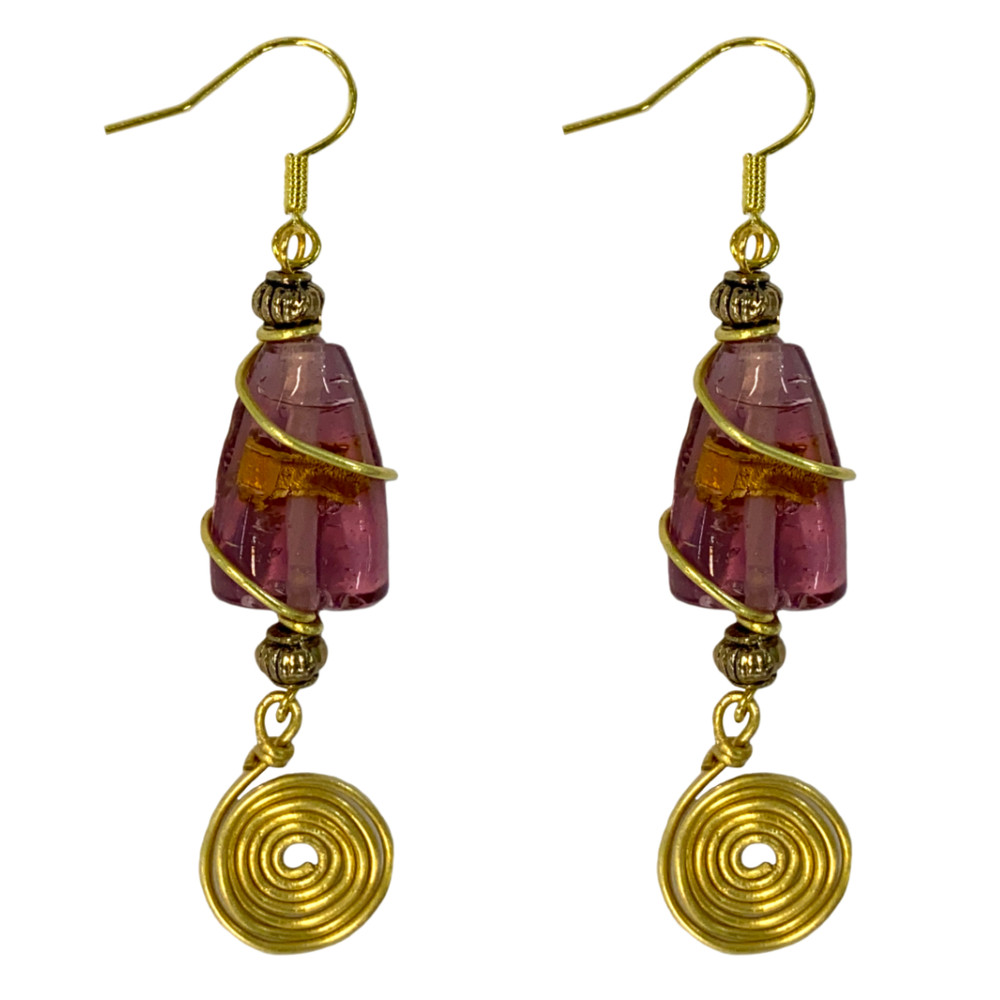
Create your own handmade wire-wrapped earrings with this easy DIY jewellery-making tutorial. These beaded swirl earrings feature foil glass beads and elegant wire spirals, making them a unique addition to any jewellery collection. Perfect for both beginners and experienced beaders, this step-by-step free beading pattern will guide you through creating a stunning pair of DIY earrings.
Follow along with our wire-wrapping instructions and learn how to make handmade earrings today!
MATERIALS REQUIRED
- 2 eye pins
- 4 x rope crown metal beads
- 2 x 17mm rose/gold foil triangle beads
- 2 x 10cm lengths of 20g beading wire
- 2 x 20cm lengths of 20g beading wire
- 2 ear wires
TOOLS REQUIRED
- Twirly Wirlie Pliers
- Wire Cutters
- Crimping Pliers
STEP-BY-STEP INSTRUCTIONS
Step 1: Prepare the Eye Pin Base
- Take an eye pin and thread on:
- 1 x rope crown metal bead
- 1 x 17mm rose/gold foil triangle bead
- 1 x rope crown metal bead
- Leave 12mm of space at the end of the eye pin and trim the excess.
- Use Twirly Wirlie Pliers to create a loop at the end of the pin, leaving a small gap between the loop and the last bead—this space will be used to wrap wire around later.
Step 2: Wrap the Triangle Bead with Wire
- Take a 10cm length of 20g beading wire and wrap it once around the eye pin between the metal bead and the triangle bead.
- Diagonally wrap the wire around the triangle bead twice.
- Secure the wrap by threading the wire between the other metal bead and the opposite end of the triangle bead.
- Trim off any excess wire.
Step 3: Create the Wire Spiral
- Take a 20cm length of 20g wire and curl one end into the smallest loop possible using Twirly Wirlie Pliers.
- Using crimping pliers, hold the small loop and carefully bend the wire around it, forming a spiral.
- Stop curling when you have about 10mm of wire left uncurled.
- Use Twirly Wirlie Pliers to make a small loop at the end.
Step 4: Assemble the Earrings
- Open the loop on one end of the eye pin and attach the wire spiral.
- On the other end of the eye pin, attach the ear wire.
- Repeat for the second earring.
Your swirl wire earrings are now ready to wear!
© www.eurekabeads.com.au These free beading instructions may be used for personal use only. Visit www.eurekabeads.com.au for access to hundreds of free beading tutorials, creative inspiration, and expert tips. We are an Australia-based supplier, offering thousands of high-quality beads and jewellery-making products, with affordable prices and fast shipping Australia-wide. Explore our wide selection of beading materials, including glass beads, gemstone beads, seed beads, crystals, charms, findings, and stringing supplies to bring your projects to life! Whether you’re into DIY jewellery, bead weaving, macramé, or craft kits, we’ve got the supplies to support your creativity. [EX45013]
Recent Posts
-
Midnight Shine Hematine & Crystal Bracelet Tutorial
Looking for a quick, elegant bracelet project using two-hole beads and silk thread? This step-by-ste …1st Jul 2025 -
Blue Mirage Necklace: Project Instructions
How to Make a Stunning Blue Glass Bead Necklace with Pendant – DIY Jewellery Project Create yo …17th Jun 2025 -
DIY Bluebell Bronze Necklace – Multi-Strand Beaded Project
Bring some ocean-inspired charm to your jewellery collection with this elegant multi-strand necklace …11th Jun 2025


