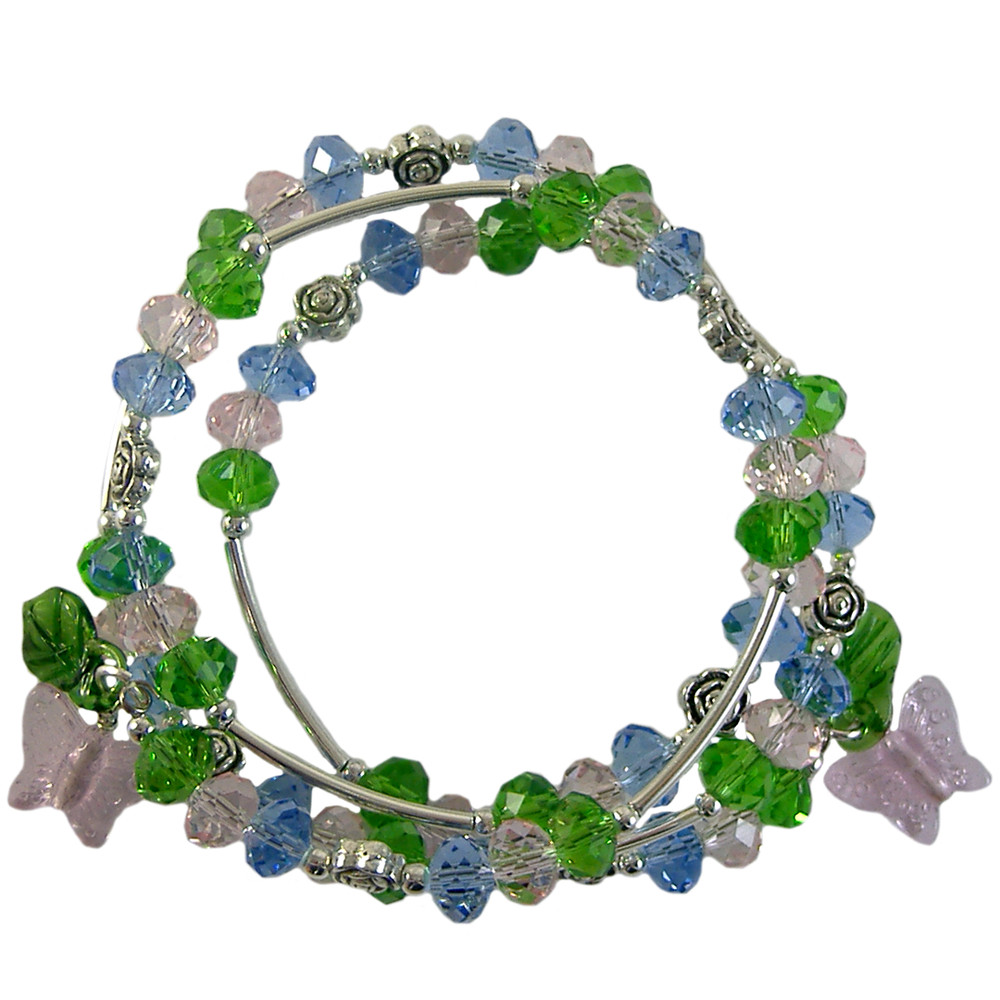
Spring Butterfly Memory Wire Bracelet: Project Instructions
Looking for a fun and easy jewellery project? This beautiful memory wire bracelet is the perfect beginner-friendly design. No need for clasps or tricky closures—memory wire is a hardened wire that retains its shape, allowing your bracelet to wrap comfortably around your wrist. With sparkly rondelle glass crystals, butterfly charms, and metal beads, this tutorial will show you how to create a colourful, wrap-around bracelet that’s both stylish and simple to make.
MATERIALS REQUIRED
- 4 loops of bracelet memory wire
- 36 x 3mm plain metal beads
- 18 chrysolite green 8mm rondelle glass crystals
- 18 pink 8mm rondelle glass crystals
- 18 light sapphire blue 8mm rondelle glass crystals
- 9 rose metal beads
- 8 plain curved metal tubes
- 2 x 50mm head pins
- 2 x pink butterfly glass beads
- 2 x 6mm strong jump rings
- 2 x small green leaf glass charms
TOOLS REQUIRED
- Memory Wire Cutters
- Twirly Wirlie Pliers
- 2 x Crimping Pliers
STEP-BY-STEP INSTRUCTIONS
Step 1: Start the Wire
Using your twirly wirlie pliers, make a neat loop at one end of your memory wire to prevent beads from slipping off.
Step 2: Begin Beading
Thread on the following pattern:
- 1 x 3mm plain metal bead
- 1 x 8mm chrysolite green rondelle crystal
- 1 x 8mm pink rondelle crystal
- 1 x 8mm light sapphire blue rondelle crystal
- 1 x 3mm plain metal bead
- 1 x rose metal bead
- 1 x 3mm plain metal bead
- 1 x 8mm light sapphire blue rondelle crystal
- 1 x 8mm pink rondelle crystal
- 1 x 8mm chrysolite green rondelle crystal
- 1 x 3mm plain metal bead
- 1 x plain curved metal tube
Repeat this sequence until all 9 rose metal beads are used.
Tip: On the final repeat, omit the curved metal tube so the bracelet ends with a metal bead.
Step 3: Finish the Wire
Trim any excess memory wire, leaving about 15mm of bare wire. Use your pliers to create a secure loop at this end.
Step 4: Create and Attach Charms
- Thread a pink butterfly bead onto each 50mm head pin. Make a loop at the top.
- Open one of the strong 6mm jump rings (use two pliers or a jump ring tool).
- Attach the jump ring to one bracelet loop, then thread on:
- 1 x butterfly charm
- 1 x green leaf glass charm
- Close securely.
- Repeat on the other side with the second set.
✅ Your Handmade Memory Wire Bracelet Is Ready!
To wear, simply wrap it around your wrist. It holds its shape perfectly—no clasp needed.
© www.eurekabeads.com.au These free beading instructions may be used for personal use only. Visit www.eurekabeads.com.au for access to hundreds of free beading tutorials, creative inspiration, and expert tips. We are an Australia-based supplier, offering thousands of high-quality beads and jewellery-making products, with affordable prices and fast shipping Australia-wide. Explore our wide selection of beading materials, including glass beads, gemstone beads, seed beads, crystals, charms, findings, and stringing supplies to bring your projects to life! Whether you’re into DIY jewellery, bead weaving, macramé, or craft kits, we’ve got the supplies to support your creativity. [EX45251]
Recent Posts
-
Midnight Shine Hematine & Crystal Bracelet Tutorial
Looking for a quick, elegant bracelet project using two-hole beads and silk thread? This step-by-ste …1st Jul 2025 -
Blue Mirage Necklace: Project Instructions
How to Make a Stunning Blue Glass Bead Necklace with Pendant – DIY Jewellery Project Create yo …17th Jun 2025 -
DIY Bluebell Bronze Necklace – Multi-Strand Beaded Project
Bring some ocean-inspired charm to your jewellery collection with this elegant multi-strand necklace …11th Jun 2025


