

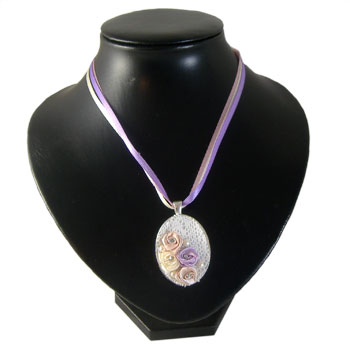
Wistful Lace Pendant: Project Instructions
Using a metal cameo setting, you can use ribbons and bows to create a unique pendant using this simple technique. Follow our easy instructions to learn how to make your own wistful lace pendant necklace.
MATERIALS REQUIRED
- 4 Swarovski SS16 hotfix creamrose pearls
- 4 x 2.5mm pointed back clear glass crystal chatons
- 2 x 10mm champagne ribbon roses
- 1 x 10mm cream ribbon rose
- 1 x 10mm lilac ribbon rose
- 5cm wide lace
- 1.3m thin lavender ribbon
- 1.3m thin cream ribbon
- 1.3m thin rose ribbon
- 5cm x 4cm square sticky backed felt
- 1 x 40mm plain oval cameo silver setting
TOOLS REQUIRED
- E-6000 glue
- Scissors
INSTRUCTIONS
Using the back of the cameo setting as a template, draw around the outside edge on the back face of the sticky backed felt. Cut the felt to the inside of the drawing, ensuring you cut away all of the drawn on line. Check the size, then remove the backing from the felt and glue to the front of the metal cameo setting.
Use the discarded plastic from the felt piece as a template, cut the wide lace to size. Glue on top of the felt.
Apply glue to the back of each of the ribbon roses and glue in place. Apply a small dab of glue to the centre of each of the ribbon roses, and place a pointy back diamante in each of the centres.
Apply a small dab of glue to the back of the each of the Swarovski hotfix pearls and glue in place between the ribbon roses. Allow 6 hours to dry.
Create a ribbon necklace by gathering together the three ribbons. Tie a knot at one end of each of the ribbons, followed by another knot, tying all three ribbons together approximately 11cm from the end. Decide upon the length of your necklace, remembering that you will be tying the ribbons into a bow at the back. Cut to size.
Make another knot, tying the three ribbons together, 11cm from the other end of the ribbons, then knot each end individually. Place a dab of glue at the end of each ribbon to stop fraying. Thread on your pendant. Tie onto your neck with a large bow. Your necklace is now ready to wear!
© www.eurekabeads.com.au These free beading instructions may be used for personal use only [EX02481]
Recent Posts
-

Simple Wooden Necklace: Project Instructions
Using large lightweight wooden beads, this versatile necklace can be worn long, eliminating the need …16th Dec 2025 -

Angel Earrings: Project Instructions
Create a sweet pair of handmade earrings featuring glass flower beads and angel wings. This beginner …19th Sep 2025 -

Midnight Shine Hematine & Crystal Bracelet Tutorial
Looking for a quick, elegant bracelet project using two-hole beads and silk thread? This step-by-ste …1st Jul 2025