Aqua 3 Strand Chandelier Necklace: Project Instructions
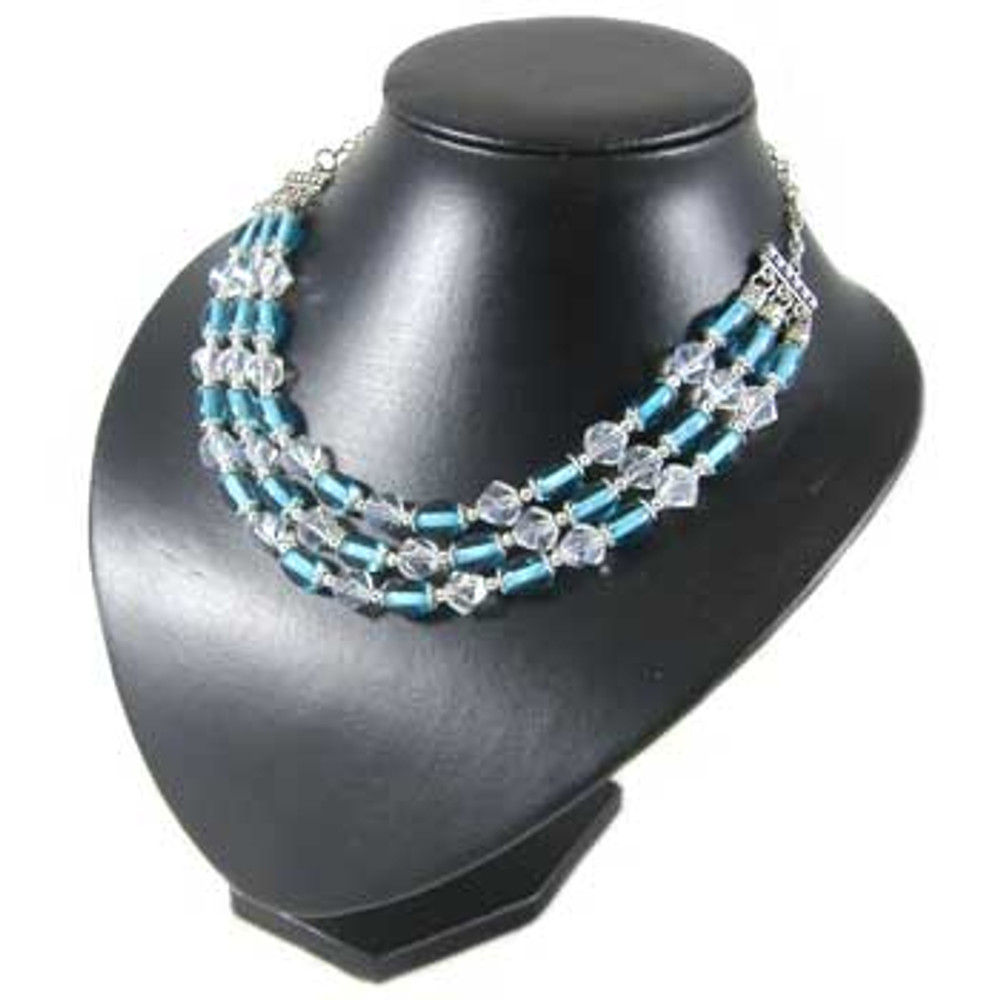
Three strands of glass crystal and glass beads work well in this necklace due to the three strand filigree bar ends used. Follow our free instructions to learn how!
MATERIALS REQUIRED
- 54 thin bead caps
- 27 oval white heart glass beads
- 48 plain metal beads
- 24 x 9mm helix glass crystal beads
- 3 x 40cm tigertail
- 6 small crimps
- 10 x 6mm strong jump rings
- 6 filigree metal tubes
- 2 x 3 strand fancy filigree bar ends
- 2 x 8cm chain
- 1 plain circle toggle clasp
TOOLS REQUIRED
- Crimping Pliers
- Wire Cutters
- Twirly Wirlies
INSTRUCTIONS
The Pattern (you'll need this for most of the necklace)
- a thin bead cap
- an oval white heart glass bead
- a thin bead cap
- a plain metal bead
- a 9mm helix glass crystal
- a plain metal bead
The main part of the necklace
Pick up the first strand of tigertail. Thread on a small crimp, a jump ring, then thread back through the crimp. Pull up tightly and squish down the crimp. Cut off any excess tigertail. Thread on a filigree metal tube. Then thread on the pattern (as above) 7 times, so you have a total of 7 oval white heart glass beads.
Then thread on:
- a thin bead cap
- an oval white heart glass bead
- a thin bead cap
Followed by a filigree metal tube, a small crimp, a jump ring, then back through the crimp. Pull up tightly and squish down the crimp. Cut off any excess tigertail. Open up one of the end jump rings, and thread through the first loop on the first 3 strand fancy filigree bar end. Close securely. Open up the jump ring on the other end of the strand and thread through the first loop on the second 3 strand fancy filigree bar end. Close securely. Put aside for now.
Pick up the second strand of tigertail. Thread on a small crimp, a jump ring, then thread back through the crimp. Pull up tightly and squish down the crimp. Cut off any excess tigertail. Thread on a filigree metal tube. Then thread on the pattern (as above) 8 times, so you have a total of 8 oval white heart glass beads.
Then thread on:
- a thin bead cap
- an oval white heart glass bead
- a thin bead cap
Followed by a filigree metal tube, a small crimp, a jump ring, then back through the crimp. Pull up tightly and squish down the crimp. Cut off any excess tigertail. Open up one of the end jump rings, and thread through the second loop on the first 3 strand fancy filigree bar end. Close securely. Open up the jump ring on the other end of the strand and thread through the second loop on the second 3 strand fancy filigree bar end. Close securely. Put aside for now.
Pick up the last strand of tigertail. Thread on a small crimp, a jump ring, then thread back through the crimp. Pull up tightly and squish down the crimp. Cut off any excess tigertail. Thread on a filigree metal tube. Then thread on the pattern (as above) 9 times, so you have a total of 9 oval white heart glass beads.
Then thread on:
- a thin bead cap
- an oval white heart glass bead
- a thin bead cap
Followed by a filigree metal tube, a small crimp, a jump ring, then back through the crimp. Pull up tightly and squish down the crimp. Cut off any excess tigertail. Open up one of the end jump rings, and thread through the last loop on the first 3 strand fancy filigree bar end. Close securely. Open up the jump ring on the other end of the strand and thread through the last loop on the second 3 strand fancy filigree bar end. Close securely.
Open up another jump ring and thread through the top loop of the first 3 strand fancy filigree bar end. Whilst it is still open, thread on one of the pieces of chain. Close securely. Repeat process for the other side of the necklace.
Open up another jump ring and thread through the end of one of the pieces of chain. Whilst it is still open, thread on the circle part of the toggle clasp. Close securely.
Open up the last jump ring and thread through the end of one of the pieces of chain. Whilst it is still open, thread on the bar part of the toggle clasp. Close securely. Your necklace is now ready to wear!
© www.eurekabeads.com.au These free beading instructions may be used for personal use only [EX32471 EX99441]
Recent Posts
-
Swarovski Christmas Present Stack Earrings: Project Instructions
This gorgeous project makes use of various sized Swarovski crystal cube beads to create Christmas th …6th Jan 2024 -
Seed Bead Phone Strap: Project Instructions
Create this great phone charm strap made using size 6 seed beads and cute feature beads.MATERIALS RE …11th Sep 2021 -
Seed Bead Necklace: Project Instructions
Create this fun necklace made using size 6 seed beads and cute feature beads.MATERIALS REQUIRED 150 …11th Sep 2021


