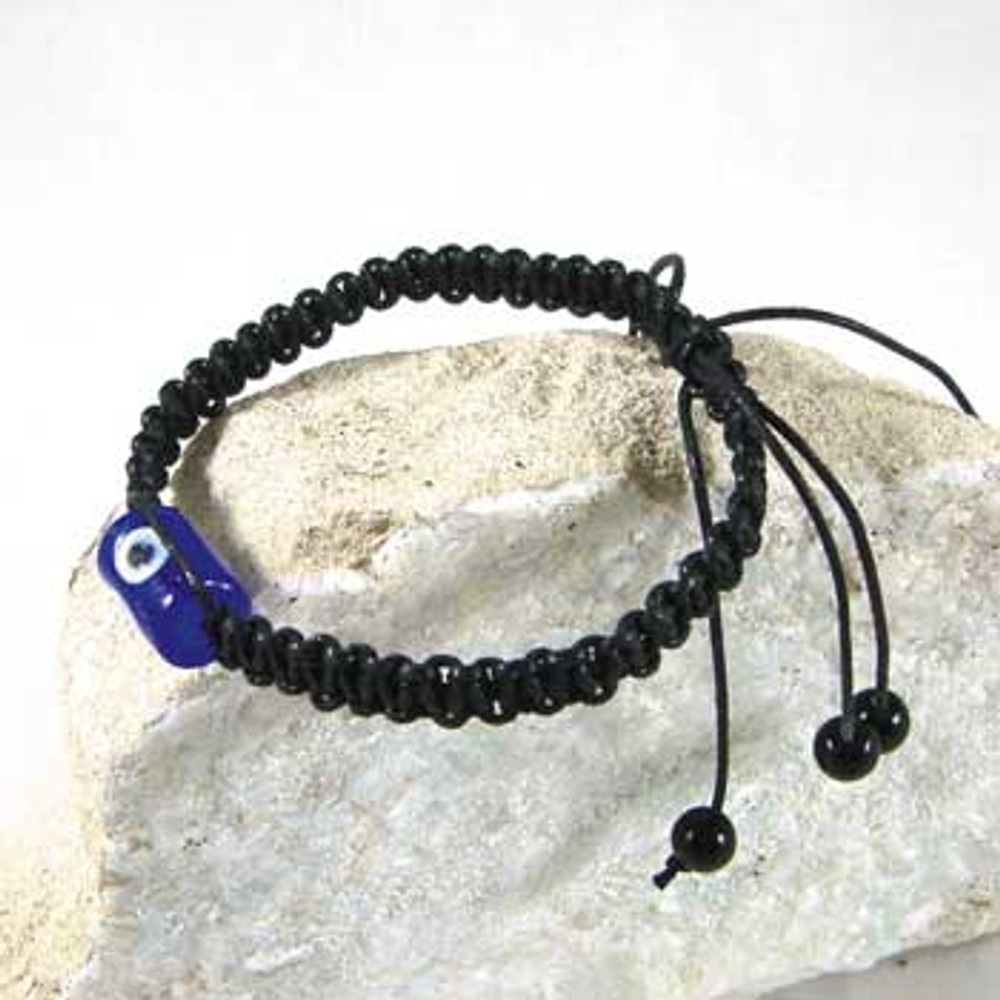
Evil Eye Macrame Bracelet: Project Instructions
Follow our free instructions to learn how to make this adjustable knotted macrame bracelet. Featuring black cord and a blue evil eye bead, once you've mastered the technique you won't be able to stop!
MATERIALS REQUIRED
- 5 metres beading cord
- 1 blue evil eye glass tube bead
- 8 black small opal round beads
TOOLS REQUIRED
- 1 wire coat hanger
- clear nail polish
- 4 sticky labels
INSTRUCTIONS
note: quantities in indicated make a 'standard' bracelet (our bracelet is 18cm). Our bracelet was made with black cord.
Cut the five metre length of cotton cord in half. Then fold each of your two pieces of cotton cord in half again. I have used four colours of cord - knotting them in the centre to help simplify the instructions. To clarify this for yourself, write on two of the labels, brown and orange and attach them to either end of one piece of cord. On the other cord, attach labels reading purple and yellow
Loop the centre of the brown/orange cord over a wire coat hanger. Drag the tails of the cord through the fold at the top, attaching the cord to the wire. Make sure that the brown strand is on the left hand side and the orange is to the right. Do the same for the purple/yellow strand. Hold the project in place by hooking the coat hanger over a static object like the rung of a chair or a doorknob.
This is a basic macrame knot- it sounds complicated but is a standard household square knot with your two centre strands running straight down through the middle. Starting 120mm from the coat hanger take the cord on the right hand side, (the yellow strand) and loop the cord so it makes the shape of a backwards facing L over the top of your strands. Take the strand on the left hand side (brown) and make an L shape going over the (yellow) strand, under your two centre (orange/ purple) strands and then over the top of the far right strand (yellow).
With your yellow strand on the left hand side make another L shape over your two centre strands. Take the brown strand and loop over the yellow, under the purple and orange centre strands and through the yellow loop.
Pull this knot tight then repeat the knot until you have a total of 20 knots.
Thread the two centre strands (orange and purple) through an evil eye tube bead and pull up to the knots.
Bring the yellow strand down below the bead and make another backward facing L. Take the strand on the left hand side (brown) and make an L shape going over the (yellow) strand, under your two centre strands and then over the top of the far right strand (yellow).
Pull the strands tight so that they hold the bead in place.
Repeat the knot so that you have 20 knots below the bead.
Cut the two sets of strands off the coat hanger leaving 110 mm tails. Take your top two centre strands (orange and purple) and lay them along the centre of the last knot on the bottom half of your bracelet. Take the yellow strand from the bottom half and do another knot - this time going over and under all four centre strands.
Do the same again but with the yellow and brown strands from the top half of the bracelet. Continue doing knots from either end until you have a bracelet that is approximately the size of your wrist. The next step is to make this bracelet adjustable so that it can be easily be removed.
Slide a black small opal round bead on each of the cords and tie 60 mm from the last knot of the bracelet. Put a drop of clear nail polish over the knots below the black beads to secure.
To open the bracelet gently pull the two sections of macrame knots apart. They will slide along the centre sections until stopped by the black beads. When placed on the wrist, gently tighten by pulling on the black beads on the centre strings. Your bracelet is now ready to wear!
© www.eurekabeads.com.au These free beading instructions may be used for personal use only [EX30281]
Recent Posts
-
Swarovski Christmas Present Stack Earrings: Project Instructions
This gorgeous project makes use of various sized Swarovski crystal cube beads to create Christmas th …6th Jan 2024 -
Seed Bead Phone Strap: Project Instructions
Create this great phone charm strap made using size 6 seed beads and cute feature beads.MATERIALS RE …11th Sep 2021 -
Seed Bead Necklace: Project Instructions
Create this fun necklace made using size 6 seed beads and cute feature beads.MATERIALS REQUIRED 150 …11th Sep 2021


