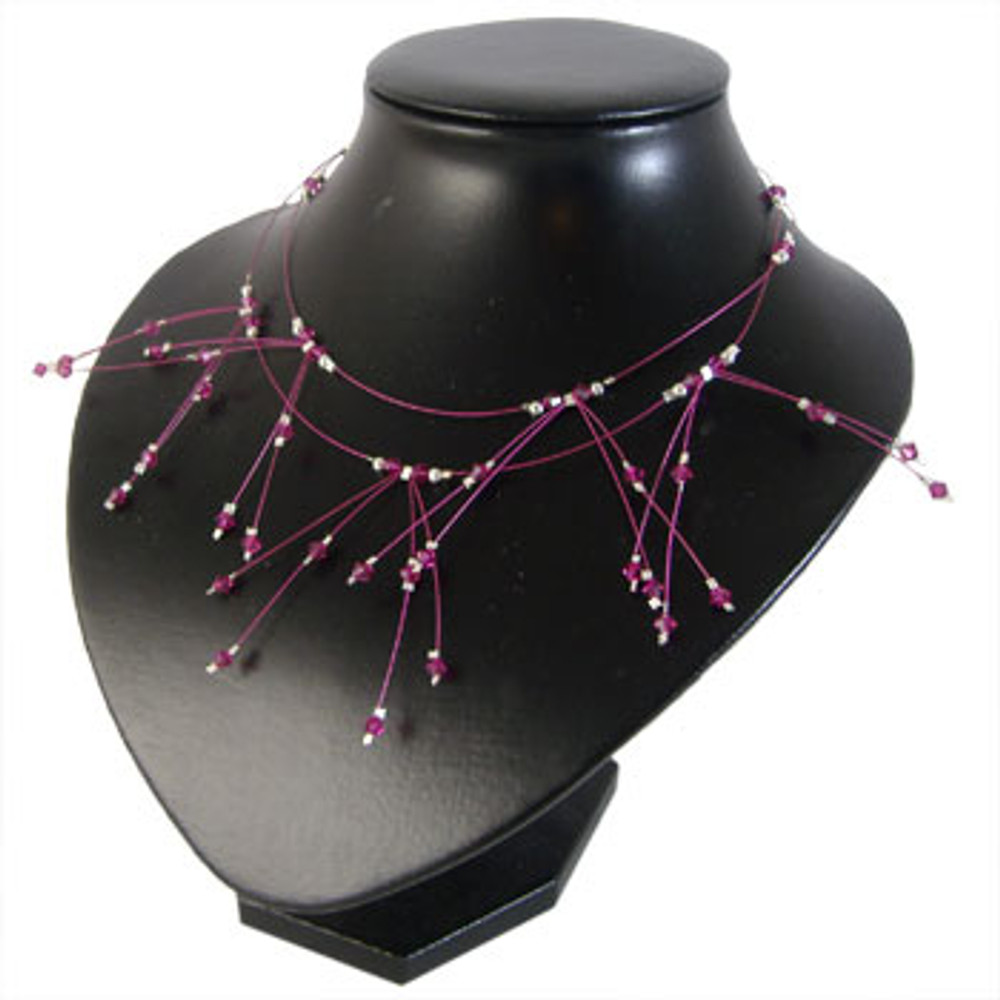
Fuchsia Waterfall Necklace: Project Instructions
This fun project uses bright coloured tigertail to create a statement. This particular pattern uses pink tigertail, but also looks great in a variety of colours!
MATERIALS REQUIRED
- 2.5m x tigertail
- 80 x small crimps
- 5 x large crimps
- 18 x plain metal balls
- 1 x parrot clasp
- 2 x 6mm strong jump rings
- 44 x 4mm Fuchsia Swarovski Bicones
- 2 x Wire Protectors
TOOLS REQUIRED
- Twirly Wirlie Pliers
- Wire Cutters
- Crimping Pliers
INSTRUCTIONS
Cut 2 x 50cm of tigertail. Thread on a small crimp over both wires, a wire protector, then thread back through the crimp. Pull up tightly and squish down the crimp. Cut off any excess tigertail.
We will start by making a floating bead necklace, ie: a necklace with sets of beads floating or separated by crimps that hold the beads in place along the tigertail wire. Separate the strands and start working on one side, we will call this first side Strand 1.
Strand 1
Thread one small crimp onto Strand 1, crimping into place 120mm from the parrot clasp.
Thread on your first set of floating beads (Set A): this comprises of
- one plain metal ball
- one 4mm fuchsia Swarovski crystal bicone
- one plain metal ball
- one small crimp
Crimp in place.
Continue working on Strand 1. Leave a 50mm gap and thread on one small crimp and crimp into place. Thread on your second set of floating beads (Set B), comprising of:
- one plain metal ball
- one 4mm fuchsia Swarovski crystal bicone
- one large crimp
- one 4mm fuchsia Swarovski crystal bicone
- one plain metal ball
- one small crimp
Leave the beads slightly loose (a 2mm gap), crimp down the last small crimp, making sure that the large crimp in the middle is left open.
Repeat the pattern - 50mm from the last set, thread on one small crimp and crimp into place. Then thread on:
- one plain metal ball
- one 4mm fuchsia Swarovski crystal bicone
- one large crimp
- one 4mm fuchsia Swarovski crystal bicone
- one plain metal ball
- one small crimp
Leave the beads slightly loose and crimp down the last small crimp.
Finish the sets on Strand 1 with a repeat of the first set (Set A) of beads, i.e.: 50mm from the last set place a small crimp and crimp down. Then thread on:
- one plain metal ball
- one 4mm fuchsia Swarovski crystal bicone
- one plain metal ball
- one small crimp
Crimp into place.
Strand 2
Thread one small crimp onto Strand 2, crimping into place 100mm from the parrot clasp. Thread on your first set of floating beads (Set A): this comprises of
- one plain metal ball
- one 4mm fuchsia Swarovski crystal bicone
- one plain metal ball
- one small crimp
Crimp in place.
Continue working on Strand 2. Leave a 50mm gap and thread on one small crimp and crimp into place. Thread on your second set of floating beads (Set B), comprising of:
- one plain metal ball
- one 4mm fuchsia Swarovski crystal bicone
- one large crimp
- one 4mm fuchsia Swarovski crystal bicone
- one plain metal ball
- one small crimp
Leave the beads slightly loose (a 2mm gap), crimp down the last small crimp, making sure that the large crimp in the middle is left open. Repeat the pattern 50mm from the last set, two more times. Finish S2 by repeating Set A 50mm from the last set of beads.
Gather the ends of the tigertail together and thread on one small crimp and a wire protector (measuring to make sure the crimp is 120mm from Set A on Strand 1 and 100mm from Set A on Strand 2), then drag the tigertail ends back through the small crimp. Crimp down, wire protector in place.
Trim off any excess wire close to the small crimp.
"Long Tails"
Cut 5, 120mm long pieces of tigertail. Fold each strand in half. Working only on one side of the tigertail. 20mm from the centre fold, thread on and crimp into place one Set A of beads:
- one small crimp
- one 4mm fuchsia Swarovski crystal bicone
- one small crimp
Working on the same side crimp into place place a second Set A of beads at the end of the tigertail. Repeat on all 5 pieces of tigertail.
"Short Tails"
Cut 5 pieces 100mm long pieces of tigertail. Fold each strand in half. Only on one side of the tigertail thread on and crimp into place one Set A of beads at the very end of the tigertail:
- one small crimp
- one 4mm fuchsia Swarovski crystal bicone
- one small crimp
Repeat on all 5 pieces of tigertail (you should end up with 5 lots of Set A, 1 on each strand).
Finish the necklace
Starting on S1, thread on one "long tail" and one "short tail" through the large crimp in the centre of Set B. Pull halfway through, and squish down the large crimp. Thread the matching set of beads (i.e. 2 lots of Set A on the long tail and 1 lot of Set A on the short tail). Continue making the tails and threading them through all of the Set B's on the necklace.
Fold in the short tails so that they sit closer together.
Open up a jump ring and thread it though the wire protector and the loop on the parrot clasp and close securely.
Open up another jump ring and thread it though the wire protector on the other side of our necklace, attach the extension chain and close securely.
Your waterfall necklace is now ready to wear!
© www.eurekabeads.com.au These free beading instructions may be used for personal use only [EX45481]
Recent Posts
-
Swarovski Christmas Present Stack Earrings: Project Instructions
This gorgeous project makes use of various sized Swarovski crystal cube beads to create Christmas th …6th Jan 2024 -
Seed Bead Phone Strap: Project Instructions
Create this great phone charm strap made using size 6 seed beads and cute feature beads.MATERIALS RE …11th Sep 2021 -
Seed Bead Necklace: Project Instructions
Create this fun necklace made using size 6 seed beads and cute feature beads.MATERIALS REQUIRED 150 …11th Sep 2021


